Sponsored

The Force Is Strong"R" With This One

OP
OP
50 Deep

50 Deep

Signature Wheel Ford Rep
Gold Sponsor
Joined
Dec 8, 2015
Threads
225
Messages
4,795
Reaction score
7,015
Location
Sacramento, CA
Website
www.signaturewheel.com
Vehicle(s)
2017 GT350R
Awesome, thanks! Mine is showing up on Friday. Looking forward to installing it!
Excellent writeup man, cars looking awesome!
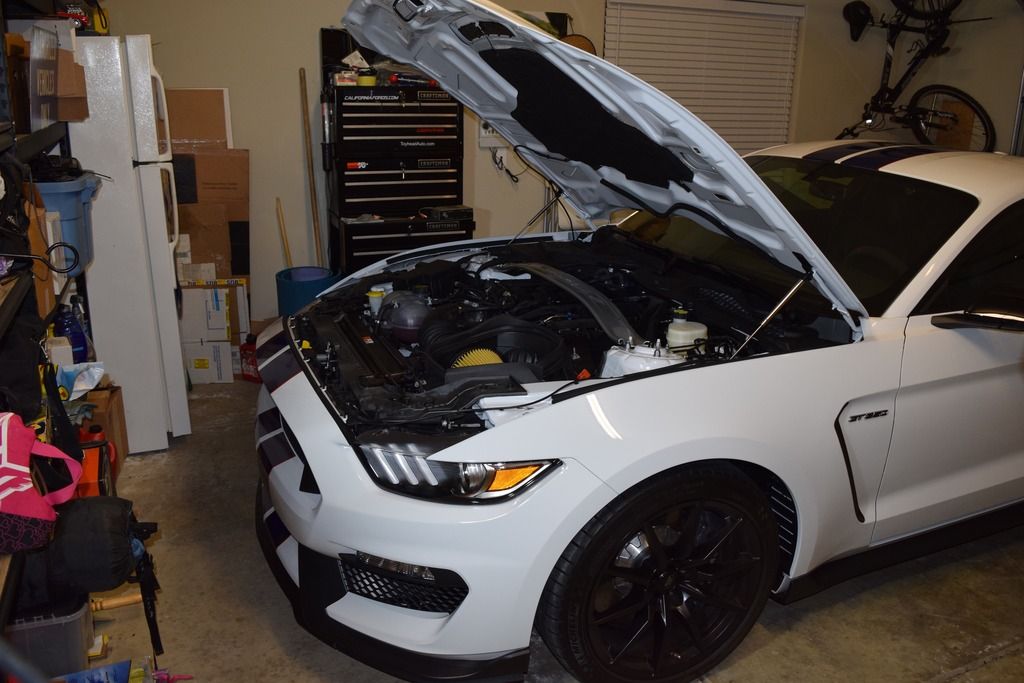
Thanks guys. It didn't turn out too bad. The shadow black scratches easy though. Be gentle with it.
Very nice write up.. That will help us all out..
[MENTION=20243]50 Deep[/MENTION] loosen up the inner bolt of the rear bumper on the driver side and you can line up the bumper flush with the quarter. I had to do the same on mine.


Sent from my iPhone using Tapatalk
I will take your advice on that. I have to install some lights near there and will play around with it then.
Sponsored


Epiphany

Well-Known Member
Joined
Oct 11, 2015
Threads
69
Messages
7,486
Reaction score
11,743
Location
Global
Vehicle(s)
I like to disassemble things.
Hope this info was helpful. I do not do many write ups so those of you with better ideas or specifics feel free to add them. Or if you have a better way of doing it.
You did a great job. Keep up the good work.
 

Blaze489

Well-Known Member
Joined
Feb 10, 2016
Threads
27
Messages
481
Reaction score
228
Location
Metairie, LA
Vehicle(s)
2016 SHELBY GT350 Magnetic Track Pack
Got all the parts on today. Took about 2 hours total. Pretty easy installs with great benefits. Will share some thoughts on each and pics/vids where i have them

Steeda Clutch Helper Spring: Took about 10 minutes to install total. Would have been faster had i done it before. Real straight forward process, but I think our cars have a second helper spring that the normal S550 cars don't have. I couldn't find a picture of it online, but you will see once you get in there. The results of the upgrade are great. I have much better feel for where the clutch engages, and still have the assist with a light clutch pedal. Also no rattle or play in the pedal. I recommend it, would buy it again, and its $10 well spent.

Redline Hood Struts: This install took about 15 minutes total. The little struts hold the hood well and will raise the hood on their own once you are about half way up. Install is super easy and worth the money. would post a picture, but you have all seen them. I sprung for the upgraded set and would buy again.


Diode Dynamics LED Interior Lights: These little puppies changed the lighting of the interior dramatically. Everything is way bright now and the cool white is awesome. I ended up unscrewing and taking off the sun visor mirror to get at the vanity bulbs. You can spend 15 minutes trying to fish out the little vanity bulbs, then another 10 trying to finesse the new ones in. Or spend 5 minutes unscrewing and popping off the mirror plate to make it much easier. Here are some after pics. This is just LED lighting, no camera flash. I would by again.


Diode Dynamics Reverse Light: I went for the upgraded model. Install took about 15 minutes. Way easier than the video i saw on CJ Pony Parts as they took too many steps. I just unbolted the 2 13mm screws, removed the 6 or so push pins, and removed the 2 larger push pins. The cover drops down in the rear enough for you to easily change the bulb without removing the front two bolts on the cover, or putting the car up in the air. You may have a little tighter space if you have the diff cooler. I would buy it again for sure. Here is a video of the reverse light and an exhaust clip.


Diode Dynamics Switchback Turn Signals: These lights were a little expensive but they turned out fantastic. The passenger side was easy enough to change since you can reach down through the opening behind the bumper. Driver side will require removing a few clips on the splash guard and wiggling past one of the coolers. Turn the wheel to the right for more clearance. I opted for amber LED parking lamps from Superbrightleds.com, instead of the cool white Diode offers. You still get the look of a clear housing, but i like having some amber lighting to the front. Here is a video of them operating. I would buy these again as well


Next round of mods soon to come
What video of the reverse light did you see from cj pony parts? All the videos i see of them are changing the reverse light on basic GT where you just grab it and change it in 1minute. Do you have any pictures or videos of you changing the light?
 

Myshelby3425

Well-Known Member
Joined
Aug 27, 2015
Threads
77
Messages
2,170
Reaction score
554
Location
Miami
Vehicle(s)
2018 GT
What video of the reverse light did you see from cj pony parts? All the videos i see of them are changing the reverse light on basic GT where you just grab it and change it in 1minute. Do you have any pictures or videos of you changing the light?

It's on Youtube. I've seen them too.


Sent from my iPhone using Tapatalk
 
OP
OP
50 Deep

50 Deep

Signature Wheel Ford Rep
Gold Sponsor
Joined
Dec 8, 2015
Threads
225
Messages
4,795
Reaction score
7,015
Location
Sacramento, CA
Website
www.signaturewheel.com
Vehicle(s)
2017 GT350R
What video of the reverse light did you see from cj pony parts? All the videos i see of them are changing the reverse light on basic GT where you just grab it and change it in 1minute. Do you have any pictures or videos of you changing the light?
The website is a little tricky. You have to click on the product and you will see an install video at the bottom. Where they have the pictures you will see a button that says "bonus video." Click on that and the one for the Shelby will pop up.

The install is super easy though. Just look under the car and you will see the two bolts and 8 or so clips.
 

Sponsored

davidnz

Well-Known Member
Joined
Feb 20, 2016
Threads
2
Messages
170
Reaction score
108
Location
Carrollton, Texas
Vehicle(s)
2006 Ford GT
Steeda Clutch Helper Spring: Took about 10 minutes to install total. Would have been faster had i done it before. Real straight forward process, but I think our cars have a second helper spring that the normal S550 cars don't have. I couldn't find a picture of it online, but you will see once you get in there. The results of the upgrade are great. I have much better feel for where the clutch engages, and still have the assist with a light clutch pedal. Also no rattle or play in the pedal. I recommend it, would buy it again, and its $10 well spent.

Did you take out the small oem spring? or re-installed it back in....
 

Texas Gator

Well-Known Member
Joined
Sep 23, 2015
Threads
8
Messages
124
Reaction score
45
Location
DFW area
Vehicle(s)
2016 GT350 magnetic w/blk stripes, tech pack
Remove both springs and the white spacer and replace with the single steeda spring. Works great!

Sent from my Nexus 5 using Tapatalk
 
OP
OP
50 Deep

50 Deep

Signature Wheel Ford Rep
Gold Sponsor
Joined
Dec 8, 2015
Threads
225
Messages
4,795
Reaction score
7,015
Location
Sacramento, CA
Website
www.signaturewheel.com
Vehicle(s)
2017 GT350R
Remove both springs and the white spacer and replace with the single steeda spring. Works great!

Sent from my Nexus 5 using Tapatalk
This......

Remove the stock double spring setup all together.
 

byklin

Well-Known Member
Joined
Oct 9, 2014
Threads
23
Messages
495
Reaction score
75
Location
CA
Vehicle(s)
2015 Magnetic GT
50deep, I have a spoilerless trunk. Do I need to remove the liner to drill holes? Or do I just need to remove the rubber stoppers. Thanks in advance!

Edit: Nvm I see there are two bolts in the middle. Hmm, I wonder if it would be good enough just to install the outer bolts.
 

Ven0r

Well-Known Member
Joined
May 25, 2015
Threads
5
Messages
190
Reaction score
176
Location
Burlington, ON
First Name
Jay
Vehicle(s)
GT350R, 2016 Focus RS, 2013 Raptor
50deep, I have a spoilerless trunk. Do I need to remove the liner to drill holes? Or do I just need to remove the rubber stoppers. Thanks in advance!

Edit: Nvm I see there are two bolts in the middle. Hmm, I wonder if it would be good enough just to install the outer bolts.
You will need to remove the liner to attach the 2 inner bolts. There is also a guide hole drilled in the middle. The liner comes out in about 2 mins though, very easy to remove.
 

Sponsored
OP
OP
50 Deep

50 Deep

Signature Wheel Ford Rep
Gold Sponsor
Joined
Dec 8, 2015
Threads
225
Messages
4,795
Reaction score
7,015
Location
Sacramento, CA
Website
www.signaturewheel.com
Vehicle(s)
2017 GT350R
50deep, I have a spoilerless trunk. Do I need to remove the liner to drill holes? Or do I just need to remove the rubber stoppers. Thanks in advance!

Edit: Nvm I see there are two bolts in the middle. Hmm, I wonder if it would be good enough just to install the outer bolts.
You might be able to get away with that, but you would have to cut the guide pins and bolts off of the spoiler for the ones you don't make holes for. The liner takes all of 5 minutes to remove. Super easy

Marking and drilling the holes shouldn't be a big deal. The spoiler will come with a template.

You should plan on drilling the holes and painting the metal on the areas you drill to protect from rust. Let that cure and then install the spoiler. Your process will be more involved, but do it right or don't do it at all ya know.
 

byklin

Well-Known Member
Joined
Oct 9, 2014
Threads
23
Messages
495
Reaction score
75
Location
CA
Vehicle(s)
2015 Magnetic GT
You might be able to get away with that, but you would have to cut the guide pins and bolts off of the spoiler for the ones you don't make holes for. The liner takes all of 5 minutes to remove. Super easy

Marking and drilling the holes shouldn't be a big deal. The spoiler will come with a template.

You should plan on drilling the holes and painting the metal on the areas you drill to protect from rust. Let that cure and then install the spoiler. Your process will be more involved, but do it right or don't do it at all ya know.
yeah I agree. I will just do the full install and protect the paint.

do you need to prime, paint, and clear for the parts that are drilled? I'm assuming yes.
 
OP
OP
50 Deep

50 Deep

Signature Wheel Ford Rep
Gold Sponsor
Joined
Dec 8, 2015
Threads
225
Messages
4,795
Reaction score
7,015
Location
Sacramento, CA
Website
www.signaturewheel.com
Vehicle(s)
2017 GT350R
yeah I agree. I will just do the full install and protect the paint.

do you need to prime, paint, and clear for the parts that are drilled? I'm assuming yes.
The main area you have to protect is where the drill bit goes through the metal. You may experience a small amount of flaking around that too given the water based paint. Use blue painters tape around the area you are drilling to minimize paint lifting or the drill bit skipping.

If anything I would just get some touch up paint (paint pen/Color chip), put it on a small paint brush, and apply a coupe small coats on any exposed area. If you can get some automotive clear in a small quantity I would apply it over the paint in the same manner also. Let it cure overnight and then install in the morning. The primer is optional, but if you have the time then I would. All this will be covered by the spoiler, but its just peace of mind I guess.

The threads from the bolt and the locating pin are going to be bouncing around as you install the spoiler. Really the hardest part is being patient enough to let the paint dry before you install.
 

byklin

Well-Known Member
Joined
Oct 9, 2014
Threads
23
Messages
495
Reaction score
75
Location
CA
Vehicle(s)
2015 Magnetic GT
thanks for the advice! I will be sure to refer to it as I install the wing this weekend.


Top