Sponsored

Rear "BMR" all at once, some advice/tips please

Dramad1

Well-Known Member
Joined
Jun 3, 2015
Threads
11
Messages
273
Reaction score
65
Location
San Diego
Vehicle(s)
2015 GT, PP, Blk
Over the last several months I've have been aquiring BMR's full rear set up as well as halfshafts and driveshaft. The final pieces have arrived, time for install.
So tonight I dropped the rear out of the car to install the diff bushings tomorrow along with the rest of the goodies. The rear came out pretty easy, just hope it goes back in that way. I'm on rear jack stands in my drive way.
So it got dark quick and I have no garage or shop lights, just a head lamp. Called it a night, didn't want to look like a tweeker wrenching on my car in the dark with my head lamp. So as I was putting stuff away, I got to thinking. How am I going to tackle all these mods. I have 2 days to be finished am I'm working alone, rain is coming.
List of mods going on
BMR diff bushings
BMR craddle lock out kit
BMR adj toe rods
BMR sperical vert links
BMR handling springs
BMR lower control arm bushing
BMR camber bolts
Viking crusaders handling shocks
DSS halfshafts 800 hp
DSS cf driveshaft 900hp
And I want to swap out the stock toe rod bearing to use in the knuckles.

So by the list you can see there may be a lot of swearing going on. Lol, but I need some help as far as order to install these mods in so I don't back track. I'm wondering if I need to wait until I reinstall the rear craddle before doing the Craddle lock out kit. Hmmm. Only reason I am trying to do it all at ice is because I didn't want to take the rear end apart a bunch of times.
Can anyone that has done the whole rear at once give me some advice, tips, pointer, help please. Modding begins at 7am tomorrow

Here a pic of the rear out of the car
Sponsored

 
Last edited:

Skotish

New Member
Joined
Nov 24, 2015
Threads
0
Messages
3
Reaction score
0
Location
NC
Vehicle(s)
2016 GT Convertible
As you didn't get any help, can you post your learnings as you go through this for the rest of us.
 

'Merica

Well-Known Member
Joined
Mar 5, 2015
Threads
31
Messages
1,418
Reaction score
425
Location
Arkansas
Vehicle(s)
Z51 3LT Stingray
Cradle lockout will take like 30 minutes with the rear in the car. Makes sense to do it as you're putting everything back in.
 

Soonertim4

Well-Known Member
Joined
Dec 4, 2015
Threads
25
Messages
512
Reaction score
234
Location
Spring, Tx
First Name
Timothy
Vehicle(s)
2021 twister orange gt performance pack
Damn dude. Good luck:clap2:
 

db252

Equinsu Ocha
Joined
Jan 1, 2016
Threads
44
Messages
1,474
Reaction score
876
Location
Bay Area, CA
Vehicle(s)
16 GT Premium/PP/Nav
Almost everything you are doing could be done with the irs connected to the car. The two that will be substantially easier are the BMR differential bushings and the lower control arm bushings. Getting your control arms disconnected is the priority and to get the old bushing pushed out and the new one in. You also have the PP package and since you are replacing your toe rods, the bushing that's in those is the ford racing version which you can press out and replace the knuckle bushing in the lower control arm with that since it's a better bushing and a no cost upgrade. (oops, never mind this last thing as you already stated it).
Set your springs and put the irs back in finishing everything else's that it back in. Sway bar end links might be the only other thing I suggest. Fun stuff.
 

Sponsored

OP
OP

Dramad1

Well-Known Member
Joined
Jun 3, 2015
Threads
11
Messages
273
Reaction score
65
Location
San Diego
Vehicle(s)
2015 GT, PP, Blk
Photo bucket is undergoing maintenence :(. Photos up as soon as I can.
So, I was able to remove all of the diff bushings. What a pita that was, sawzall and a lil pb blaster and a 4# beater did the trick. Took me 2 hours to get all 4 out. New bmr bushings went in and diff mounted back up.
Started working on pressing out the lca bearings next. I had a lil home made tool, 1/2" all thread and several pipe sizes, washers and flat plate with hole drilled in it. Took me about 30 mins to get the drivers side out, lil bit of pb blaster several time and my handy elec impact wrench. After I got it out, I used some steel wool and brake clean to clean it up, lubed it up and started to press the new bearing in. I had it almost all the way in and snapped the all thread as well as flattened the nut out with my impact. Took a quick drive in the wife's car to the hardware store, picked up 3 more sticks of precut (18") all thread just in case I snapped another on the opposite side. Got home and finished pressing in the new bearing on the drivers side.
Jumped to the passengers side and started to press the stock bearing out. I immediately snapped off the all thread, right in the middle, making it to short to try and re use. Good thing I bought 3 rods of it. Swapped out the all thread and tried again. I was making very lil progress this time around. I sprayed some more pb blaster and let it soak for a miute. Tried again and ended up snapping the 2nd all thread. Hmmmm. Okay swapped in my final rod and worked very slow with it. I got the bearing to pop out about a 1/2" but couldn't get it to budge any further before snapping my final all thread. Fml, my wife saw me pissed off and called her girlfriend. Turns her friends old man has a bearing press and said to cruise over with my part and a 6 pack. Boom.....done on my way, brought him a 12k :). His girl shows me the press and says have at it, old man ain't home...???... okay. Get it pressed out and new one in, in, under 10 mins. Oh yeah. Her old man shows up and we kill the 12pk, crap I have work to do. I bounce home and get back to work.
Get back home and decide knuckle bearing will be another day, gotta get this thing done asap. Next I reassemble the lca, swap the toe rods, vert links and get the new half shafts mounted. I through the spindle back on and threadlocked and torqued everything down. I had to use a piece of that all thread and a few nuts to stretch out the toe rod mount on the lca. Was to snug to fit with the aluminum bushings. Went smooth and got it done. Repeated steps on the other side. Time ran out and had to call it quits for the day and clean up all my tools and parts scattered around my driveway.
Tomorrow I will be installing the Viking shocks and 1 piece drive shaft 1st thing. The rear craddle is ready to go back in, just have to throw the new rear handling shocks in and cut the bump stops. I want to make a lil craddle out of wood to help stable it when I go to jack it back up and into place. To sketchy with it just on the floor jack, front end heavy and wants to tip off the jack when I lift it up not to mention it weighs a ton. Seems heavier after the new half shafts.
Once I get the Craddle up and the 4 main craddle bolts started, I will be installing the cradle lock out kit then snug the Craddle back up. Then reconnect the new driveshaft, button up the shocks, torque and re check everything, diff fluid change, then lower the rear and then work on installing the front springs.
Hopefully I can get all that knocked out tomorrow. Then I'm going to drive my ass to the tire shop and get an alignment.
Once I leave there, start out easy and get a feel for the new feel.:)
Photo bucket is down for the moment, but I'll get pics up asap and continue snapping a few progress shots as tomorrow's day progresses.
 

Quiksilver15

Well-Known Member
Joined
Jul 26, 2015
Threads
23
Messages
524
Reaction score
132
Location
Houston
Vehicle(s)
2015 Ingot Silver GT
I would recommend putting a few miles on the springs cycling them befor an alignment. Those new springs are probably going to settle

That's a big undertaking for a 2 day install. Great work!
 

16oxgt

New Member
Joined
Nov 27, 2015
Threads
0
Messages
3
Reaction score
0
Location
Pa
Vehicle(s)
2016 gt pp
Damn good progress just bangin it out in the driveway! And a great description/story. Should be inspiring for other diy'ers.
 

valentinoamoro

Well-Known Member
Joined
May 31, 2014
Threads
148
Messages
1,288
Reaction score
373
Location
US
Vehicle(s)
15 TY Mustang GT
Def share detailed driving thoughts with this setup as often as you can.

I'll really appreciate it - this is what I plan on getting! (only the BMR pieces except the toe rods and Koni Yellows or FRPP dampers instead of Viking!).
 
OP
OP

Dramad1

Well-Known Member
Joined
Jun 3, 2015
Threads
11
Messages
273
Reaction score
65
Location
San Diego
Vehicle(s)
2015 GT, PP, Blk
Photos are uploading now, taking forever. But the rear is in and car is back on the ground. My buddy was suppose to come help, he flaked. Then my chick's uncle said he would help me reinstall the rear,......he flaked, so I did it all alone.
What a pita doing it by yourself. If in your driveway, no lift and on Jack stands, having another person to help would make things so much easier. I'd also recommend using a trans jack instead of a floor jack like I did. It will help balance the whole thing instead of it teter tottering around on the floor jack. Also some cribbing like scrap 2x4's, 1x4's, cinder blocks, and extra jack stands etc will help keep it balanced as you raise it into the car. I cheated and raised the rear end pretty high to start, then when reinstalling the rear, I jacked it up the rear craddle and cribbed everything very slowly too a lil past half way up. Then I lowered the car down a bit onto the rear craddle but still high enough to work under. Then resumed lifting and cribbing the Craddle it place. Took alot of work but take your time and you will get it. What kinda sucked was getting the rear craddle all the way up and Craddle and then realizing I had to move it about 6 more inches forward. Few bottle Jacks and readjusting the cribbing did the trick.
Once it was up, I got the 4 main bolts started and the busted out the lock out kit. After the diff bushings and lca bearings, the lock out kit was a breeze. Took 30 mins to do both sides and snug up and torque the Craddle down. Super simple install, just follow the directions and your golden.
After all that, I buttoned up the brakes and e brake lines as well as the bottom shock bolts. The forward (towards the front of the car) bolts on the shocks(both sides) was a bit of a pain the reach, even using 2 swivels on my ratchet. You have to hold the bolt with a socket after you spin the nut on to torque to spec. I thought they were plenty tight by hand, but after checking with the torque wrench, they all turned a few more times.
Next up was the driveshaft. I knew it would be a pretty simple install but was kind of surprised that it didn't come with install instructions. I checked DSS website to see if they had a pdf file, couldn't find anything. Checked YouTube and found drive shaft install vids but none for the DSS cf driveshaft. Watched parts of a few for shaftmasters installs and a few older model aluminium ds's. This helped me get an idea of how it was kinda going to go, I reached out here on 6g after looking over pages and pages in the driveline section, started a thread.....it got pushed out a didn't want to wait around waiting for a reply. So after checking the part out, it was kinda obvious I had to take the two ends off and install onto the diff and trans. It went pretty smooth, loc tite everything. On the diff just make sure to work the screws in, in a star pattern slowly all the way around, just to be sure that adapter plate goes on evenly. When I first started, I thought the adapter plate would just slide into the diff. It was kinda snug and didn't want to force it in, so I started all the screws in with the edge of the adapter plate just on the inside lip of the diff. Slowly working the screws around til some resistance was felt, around the star a few times then torqued to spec witch was provide by DSS on there warranty sheet. Installed driveshaft. I used a jack stand extended up to hold the rear end while I aligned and got a screw started on the front. After I had one screw in the front, I moved to the rear and got all the rear screws in and loc tite. Then back to the front to install remaining screws. The front is a bit more difficult to get in because the "hinge/swivel/u joint" not sure what to call it, is in the way of the screw. Torquing the front will require the Allen sockets with the ball tip on the end and maybe even a low pro swivel. It was a pain. I had my son sitting in the car shifting the car into gear and back to neutral when I told him to help spin the wrench in tight quarters and so I didn't have to keep crawling out from under the car. "I need a creeper" would have helped rest my head and save my back and elbows from driveway rash. Rear was way easier to torque, just take the time and spin the shaft so you get the best alignment with your tool into Allen screw.
Finally,.......reinstalled the exhaust and tires then dropped her down gently. Kids are hungry, tools are a mess and need to be picked and cleaned up/put away. The 1st rain drops fell right as I'm picking up, whew... just in time. Front springs still need to be installed, I didn't get as far as I had hope, but I am relieved to have the rear back in and car on the ground before this rain hit. Monday I hope. Or maybe even tomorrow if the big rain holds out until the afternoon . If not then Monday, I hope for sure. Car has some knarly reverse rake right now. I have about a finger and a half between the rear tire and wheel well and about 4 fingers between the tire and wheel well on the front, looks ugly just sitting there, but at the same time it almost looks like a still shot of the car launching at 5k with the rear squat, lol
Super long post, gonna check my pics then if ready yet, I'll start posting some
 

Sponsored
OP
OP

Dramad1

Well-Known Member
Joined
Jun 3, 2015
Threads
11
Messages
273
Reaction score
65
Location
San Diego
Vehicle(s)
2015 GT, PP, Blk
Not yet, so slow lately, 15 of 28 and the ones that have uploaded are not showing up. I need to get a flikr or Tapatalk set up, photo bucket suck lately
 
OP
OP

Dramad1

Well-Known Member
Joined
Jun 3, 2015
Threads
11
Messages
273
Reaction score
65
Location
San Diego
Vehicle(s)
2015 GT, PP, Blk
Got bushings?


Going in


Diff back in

Out with the old... dem bearings!

Cleaning up

In with the new

And some thing happend with the rest of the pics, re upload fml
 
OP
OP

Dramad1

Well-Known Member
Joined
Jun 3, 2015
Threads
11
Messages
273
Reaction score
65
Location
San Diego
Vehicle(s)
2015 GT, PP, Blk
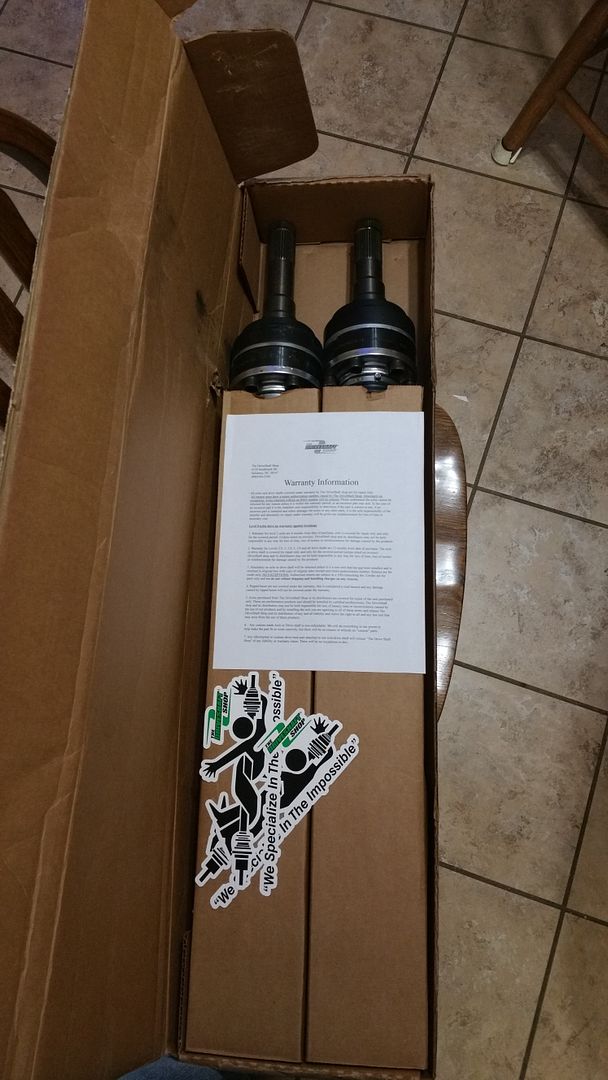
Half shafts

Toe rod photo bomb

Both sides, one side is longer, in order to seat them properly, you have to have them on the right sides. Excuse my red brick balancers

Some vert link action


Spindles back on with some stock spring action


Vikings in the house

Lil thunder

Almost forgot, trim the bump stops

How bout some lightning

Rolling into place, cribbing on the side

Handling springs and lock out hardware

Raising it up

Lock out kit going in


Started to sprikle, need to snap some pics on the ground. Fun stuff for sure.
 

Chameleon

Well-Known Member
Gold Sponsor
Joined
Feb 17, 2014
Threads
156
Messages
11,853
Reaction score
4,244
Location
S550 INTERIOR DRESS UP
Website
www.ebay.com
Vehicle(s)
03' Cobra, 05' GT, 13' GT, 15' GT
Awesome work man. You are a machine!
Sponsored


Top